Open in Google Colab
Run this exact tutorial interactively in Google Colab
Financial Bank Statement Extraction with Golden Labels
This tutorial shows how to build an evaluation dataset for an LLM that extracts financial figures from bank statement PDFs — where the golden Q&A labels travel with the PDFs as part of the seed data and get regenerated alongside each synthetic document, potentially lowering significant human time spent in labeling your datasets. The workflow:- Seed DataFramer with multi-folder data — each folder holds one bank statement PDF and a
qa-pairs.csvwith five golden Q&A pairs. - Generate a Specification — DataFramer learns the structure of both the PDF and the Q&A file.
- Edit the Specification — steer the distribution toward a specific bank profile and enforce numerical consistency.
- Run generation — produce synthetic bank statement folders, each with a matching
qa-pairs.csv. - Evaluate — extract text from a generated PDF, ask the questions, and measure exact-match accuracy against the generated golden labels.
Prerequisites
- Python 3.9+
- An
OPENAI_API_KEY - A
DATAFRAMER_API_KEY
Step 1: Read Seed Samples
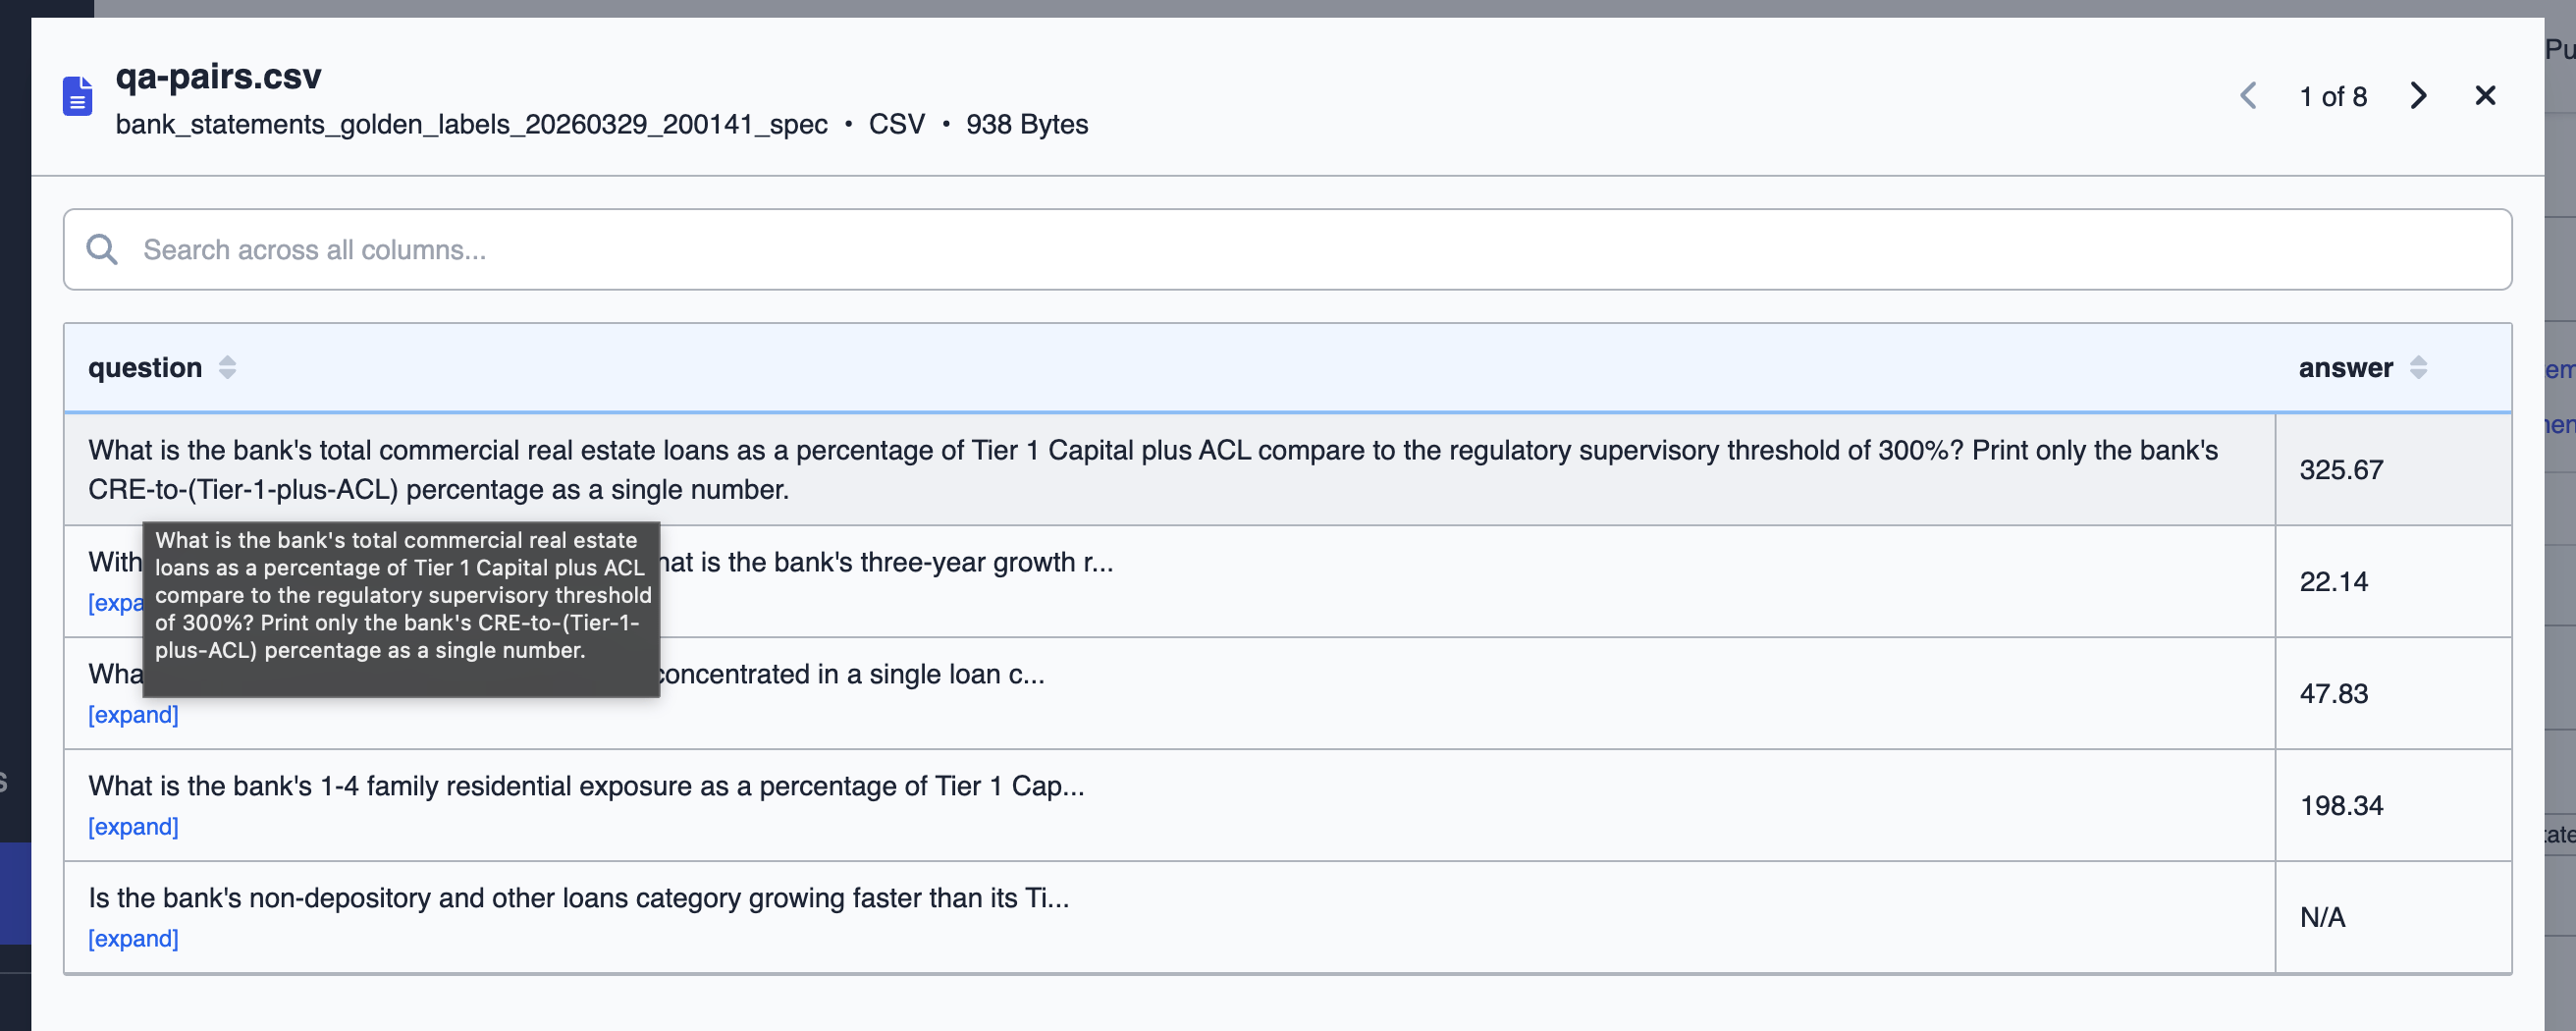
The seed data lives in afiles/ directory. Each sub-folder contains one bank statement PDF and a qa-pairs.csv with five question/answer pairs covering CRE concentration ratios, loan growth rates, and similar metrics.
Here is an example of one of the source documents:

Step 2: Create a Multi-Folder Seed Dataset
Pack every sample folder into a ZIP preserving the folder hierarchy and upload it to DataFramer. The nested structure (sample1/, sample2/, …) tells DataFramer to treat this as a multi-folder dataset — it will generate complete folders, each containing a PDF and a qa-pairs.csv.
Step 3: Generate a Specification
DataFramer analyzes the seed folders and produces a Specification. Thegeneration_objectives tell DataFramer that qa-pairs.csv contains golden Q&A pairs for the bank statement PDF in the same folder, and that Bank Profile should be a named data property.
Step 4: Edit the Specification
Steer the distribution
Override the Bank Profile distribution so that every generated sample is a CRE-heavy community bank. All other profile values receive zero weight.The spec DataFramer generates can be considerably richer than what this tutorial edits. Each property supports conditional distributions — the probability of a value can depend on the value of another property. For example, if Bank Profile is
"CRE-heavy community bank with Total CRE >300% of Tier 1", the CRE Concentration Level distribution can automatically shift toward higher buckets, while a different profile keeps it low. When you retrieve the spec YAML you will see conditional_distributions blocks alongside base_distributions; you can add or modify these by hand to express arbitrarily complex relationships between properties before running generation.Enforce numerical consistency
Append a strict requirement so the generation model verifies every number via thecalculator tool and confirms that every Q&A answer is exactly derivable from the PDF:
Step 5: Create a Generation Run
Launch a run using the updated spec. Thecalculator tool and conformance revision/filtering enforce the consistency requirement during generation.
Step 6: Download and Inspect Generated Samples
Download the completed run as a ZIP archive and extract it locally. Here is an example of a generated bank statement document: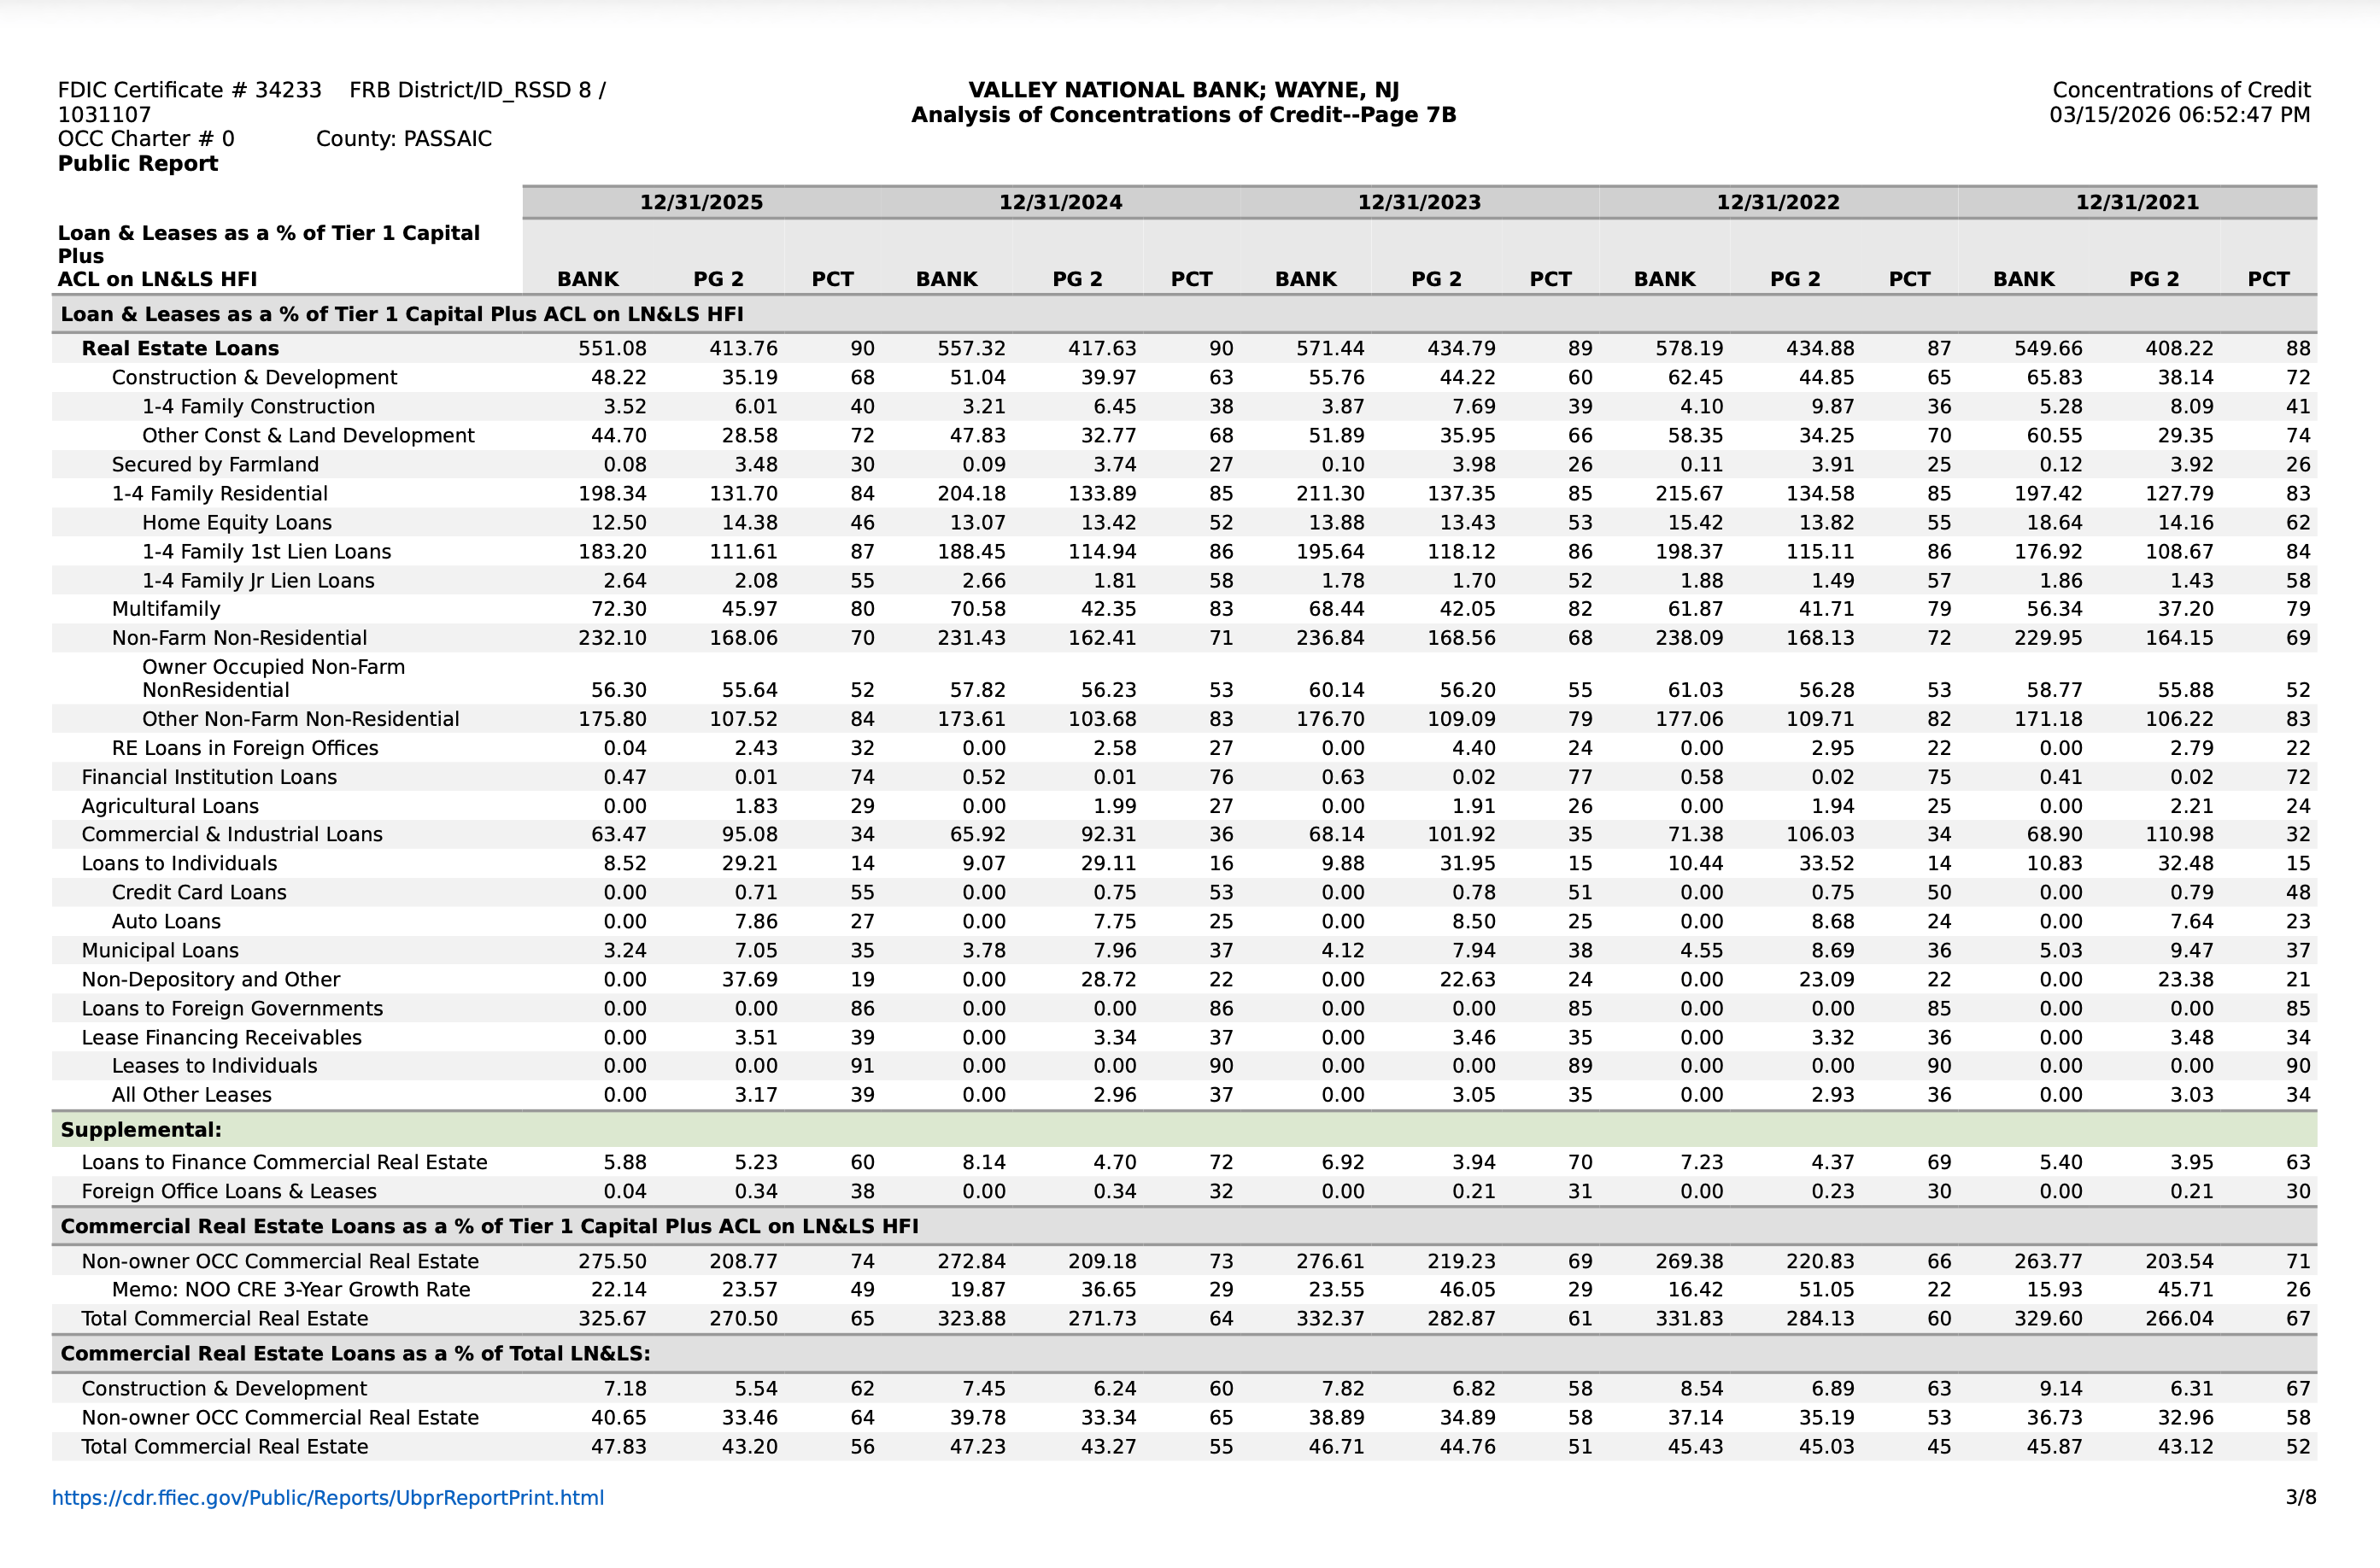
qa-pairs.csv with generated golden labels, and a folder.metadata file with DataFramer’s generation tags. Inspect the tags to confirm the spec properties were applied as configured:
Step 7: Human Review
Before running automated evaluation, review the generated Q&A pairs alongside their source PDFs to verify the labels are accurate and well-formed. Because the model was required to derive every answer directly from the PDF, most labels should be exact — but edge cases (multi-step calculations, ambiguous table formatting) are worth a manual spot-check.Step 8: Evaluate the Generated PDF
Extract text from the first generated PDF, ask each golden question using OpenAI, and compare the model answer to the golden label:Related Tutorials
Basic Use of Python SDK
Create a spec from text and generate samples
Folder Generation
Generate from multi-file or folder-based seed data